

Building a Tic-Tac-Toe Game with React.js
To upskill my React.js abilities, I decided to build an interactive Tic-Tac-Toe game—a classic childhood favorite that’s simple to implement yet highly rewarding as a learning project.


Tic-Tac-Toe
Tic-Tac-Toe is a classic two-player game that is simple to learn yet strategic enough to remain engaging. The objective of the game is to be the first player to align three of your marks—either X or O—in a row, column, or diagonal on a 3x3 grid.

In this project, we will walkthrough how to implement Tic-Tac-Toe game in React.js, Typescript, Tailwindcss and Vite.
Project Setup
Pre-requisition: In order to follow along the tutorial, you need to have some basic React.js knowledge and have your development environment setup.
To get the app ready to run, we will perform following actions:
Setting up React.js + Typescript project with Vite
Setting up TailwindCSS with Vite
Organize the folder structure
Setting up React.js + Typescript project with Vite
For this project, we going to use Vite(Javascript build tool) to help bootstrap the project. Run the following command:
npm create vite@latest react-tic-tac-toe --template react-tsOnce vite done bootstraping, a directory named react-tic-tac-toe should be created. This basic project template come with Typescript pre-configured.
Install dependecies:
cd react-tic-tac-toe
npm install
Test run the project:
npm run devYou should able to browse your app(as shown below) at http://localhost:5173

Setting up TailwindCSS with Vite
TailwindCSS is a CSS framework that provides a collection of beautiful, ready-to-use UI components.
Adding Tailwindcss to the project:
npm install tailwindcss @tailwindcss/viteConfigure the Vite plugin in vite.config.ts:
// vite.config.ts
import { defineConfig } from 'vite'
import tailwindcss from '@tailwindcss/vite' // import this

export default defineConfig({
  plugins: [
    tailwindcss(), // add this line
  ],
})
For simplicity, we will just maintain a index.css for this project, you may remove App.css from the project and any places that imported it. Then we proceed to add TailwindCSS to the project:
// index.css
@tailwind base;
@tailwind components;
@tailwind utilities;

@import "tailwindcss";

//... your css declaration goes here
Lastly, add compiled CSS in the <head> section of index.html
//index.html

<!doctype html>
<html lang="en">
  <head>
    <meta charset="UTF-8" />
    <link rel="icon" type="image/svg+xml" href="/vite.svg" />
    <link href="/src/styles.css" rel="stylesheet">  <!-- add this line -->
    <meta name="viewport" content="width=device-width, initial-scale=1.0" />
    <title>tic-tac-toe</title>
  </head>
  <body>
  ...
To test whether Tailwindcss is working, let’s change the color of the button to blue.
// App.tsx

<!-- add className="bg-blue-500" to the button -->
        <button className="bg-blue-500" onClick={() => setCount((count) => count + 1)}>
          count is {count}
        </button>
Run the app:
npm run devYou should see the button color changed to blue.
Check the official guide if you have any problem setting up the app: https://tailwindcss.com/docs/installation/using-vite
Organize the folder structure
The project is organized into the following folder structure to ensure clarity and maintainability:
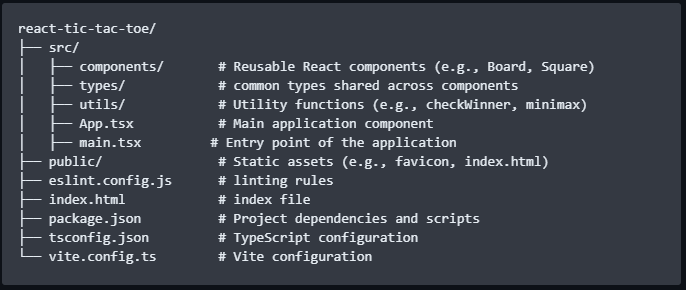
src/ folder
components/: Contains all the React components used in the application. Each component is modular and focuses on a specific part of the UI.types/: Contains common types that shared across components.utils/: Houses utility functions for game logic, such as checking for a winner and implementing AI.
Game Design
We will implement single-player mode and multi-player mode. For single-player mode, we allow user to choose AI difficulty level of “easy“, “medium“ and “hard“.
When user first landed on the page, we prompt user to choose game mode, then optionally prompt user to select AI difficulty and whether to play as “X“ or “O“ (if user selects single-player mode).
We then render the gameboard for user to play. For each step taken, we check whether if there is a winner or a draw, if yes, we show the end game screen, else we let the next player plays.
Building components
You don’t have to follow exactly the same, it’s ok to play around with the styles as long as the core functionality is attached
Before we create any components, let’s create a types.ts that holds all the common types that we going to share across components.
// src/types/types.ts

export type GameModeType = null | "single" | "multi"
export type PlayerSymbol = "X" | "O"
export type GameStatus = "initial" | "playing" | "win" | "draw"
export type Board = (PlayerSymbol | null)[]
export type AIMode = "easy" | "medium" | "hard"
Landing Page

View on source code on Github
Symbol(X or O) Selection
For single-player mode, we will prompt user to select Symbol to play and AI difficulty.

View on source code on Github
The Game Board

View on source code on Github
The End Game Screen

View on source code on Github
algo: Checking for a winner
We will use array of 9 elements to represent the game board. At initial state, we will fill the array with null, that is [null,null,null,null,null,null,null,null,null]. The above diagram show the index of the array.
Whenever player makes a move, we replace the null value with the player’s symbol. So, take the diagram above for example, X is placed at index 0, thus, we update the array to [“x“,null,null,null,null,null,null,null,null].
Now, we know that when three same symbol connected, the game is over. There are 8 possible connected lines:
// src/utils/winningChecker.ts

const winningLines = [
  [0, 1, 2], [3, 4, 5], [6, 7, 8], // Rows
  [0, 3, 6], [1, 4, 7], [2, 5, 8], // Columns
  [0, 4, 8], [2, 4, 6]  // Diagonals
]
To check whether any winner, we iterate over the winningLines and check if any of the 3 elements are connected.
// src/utils/winningChecker.ts

export const checkWinner = (board: Board): PlayerSymbol | null => {
  for (let i = 0; i < winningLines.length; i++) {
    const [a, b, c] = winningLines[i]
    if (board[a] && board[a] === board[b] && board[a] === board[c]) {
      return board[a] as PlayerSymbol
    }
  }
  return null
}
For a draw game, the condition would be all cells are filled but no 3 connected cells found.
// src/utils/winningChecker.ts

export const checkDraw = (board: Board): boolean => {
  return board.every((cell) => cell !== null)
}
algo: Implementing AI with different difficulty levels
To make the game fun, we introduce AI in single-player mode and provide 3 different difficulty level: easy, medium and hard.
Easy mode
For easy mode, we will just randomly select one empty cell from the board array.
// src/utils/aiEasy.ts

export const makeEasyAIMove = (board: Board): number => {
  const emptyCells = board.map((cell, index) => (cell === null ? index : -1)).filter((index) => index !== -1)

  if (emptyCells.length === 0) throw new Error("No empty cells")

  const randomIndex = Math.floor(Math.random() * emptyCells.length)
  return emptyCells[randomIndex]
}
Medium mode
For medium mode, we going to define some rules for the AI, we sort the rule priority from most important to least important as follows:
Select cell that can lead to immediate win.
Select cell that can lead opponent to immediate win(stop player from winning by blocking the cell).
Select center cell if it is empty(center cell is consider the most strategic position).
Select corner cells if any of them is empty.
Select edge cells if any of them is empty.
For rule 1 and 2, we need a function that tell us if player going to win in next step:
// src/utils/aiMedium.ts

const getPossibleWinningMove = (board: Board, player: PlayerSymbol): number | null => {
  const winningLines = [
    [0, 1, 2], [3, 4, 5], [6, 7, 8], // horizontal
    [0, 3, 6], [1, 4, 7], [2, 5, 8], // vertical
    [0, 4, 8], [2, 4, 6] // diagonal
  ]

  for (let [a, b, c] of winningLines) {
    const values = [board[a], board[b], board[c]]

    // return the index of empty cell if there are two connected cells with same symbol
    if (values.filter(v => v === player).length === 2 && values.includes(null)) {
      return [a, b, c].find(index => board[index] === null) || null
    }
  }
  return null
}
Now, let’s implement all the rules:
// src/utils/aiMedium.ts

export const makeMediumAIMove = (board: Board, aiPlayer: PlayerSymbol, humanPlayer: PlayerSymbol): number => {
  const availableMoves = board.map((cell, index) => (cell === null ? index : -1)).filter(index => index !== -1)

  const winningMove = getPossibleWinningMove(board, aiPlayer)
  if (winningMove !== null) return winningMove

  const blockingMove = getPossibleWinningMove(board, humanPlayer)
  if (blockingMove !== null) return blockingMove

  if (board[4] === null) return 4

  const corners = [0, 2, 6, 8].filter(index => availableMoves.includes(index))
  if (corners.length > 0) return corners[Math.floor(Math.random() * corners.length)]

  const edges = [1, 3, 5, 7].filter(index => availableMoves.includes(index))
  return edges.length > 0 ? edges[Math.floor(Math.random() * edges.length)] : availableMoves[0]
}
Hard mode
Medium mode is consider good enough, but we can still make the AI even smarter by look into few steps ahead. A common implementation for this problem is called minimax algorithm.
Minimax is a tree-based, backtracking algorithm that is used in decision-making and game theory. It is used to find the optimal move for a player(maximizer), assuming that the opponent(minimizer) is also playing optimally. The algorithm traverses the game tree recursively, maintaining the heuristic value for minimizer and maximizer.
However, the drawback of minimax algorithm is that it is slow as it needs to traverse all possible nodes(e.g. player that start the game has 9 possible moves), that is time complexity of O(b^m), where b is the branching factor and m is the maximum depth of the tree.
To solve this issue, we will optimize the algorithm with alpha-beta pruning - an optimization technique used to reduce the number of nodes that are evaluated by the minimax algorithm in a game tree. It stops evaluating a move when at least one possibility has been found that proves the move to be worse than a previously examined move. The final outcome reduces the time complexity to O(b^(m/2)).
// src/utils/aiHard.ts

const minimax = (board: Board, depth: number, isMaximizing: boolean, aiPlayer: PlayerSymbol, humanPlayer: PlayerSymbol, alpha: number, beta: number): number => {
  const winner = checkWinner(board)
  if (winner === aiPlayer) return 10 - depth
  if (winner === humanPlayer) return depth - 10
  if (checkDraw(board)) return 0

  if (isMaximizing) {
    let bestScore = -Infinity
    for (let i = 0; i < board.length; i++) {
      if (!board[i]) {
        board[i] = aiPlayer
        let score = minimax(board, depth + 1, false, aiPlayer, humanPlayer, alpha, beta)
        board[i] = null
        bestScore = Math.max(bestScore, score)
        alpha = Math.max(alpha, bestScore)
        if (beta <= alpha) break
      }
    }
    return bestScore
  } else {
    let bestScore = Infinity
    for (let i = 0; i < board.length; i++) {
      if (!board[i]) {
        board[i] = humanPlayer
        let score = minimax(board, depth + 1, true, aiPlayer, humanPlayer, alpha, beta)
        board[i] = null
        bestScore = Math.min(bestScore, score)
        beta = Math.min(beta, bestScore)
        if (beta <= alpha) break
      }
    }
    return bestScore
  }
}
Recommend readings on minimax alpha-beta pruning method:
Putting everything together
You can access the full solution here: https://github.com/jjteoh-thewebdev/react-tic-tac-toe
Final thoughts
Building this Tic-Tac-Toe game was a rewarding experience that deepened my understanding of React.js and TypeScript. I hope this walkthrough inspires you to explore the codebase and build your own projects. Happy coding!